Magento Guide d'installation
Ajoutez un assistant chat à votre Magento boutique avec synchronisation automatique des produits.
Vous êtes dans le guide d'installation développeur. Vous cherchez un aperçu de ce que Emporiqa offre à votre Magento boutique ? Voir la page d'intégration.
Démarrage rapide
Pour les propriétaires de boutique. Installez, cliquez sur Connecter, envoyez votre catalogue. Avec captures d'écran à chaque étape.
DémarrerDocumentation développeur
Pour les développeurs. Architecture, payload webhook, modèles de personnalisation et commandes CLI.
LireDémarrage rapide
Installez le module, cliquez sur Connecter à Emporiqa, envoyez votre catalogue. Le module ne touche ni à votre thème ni à votre panier. Vous pouvez désactiver le module depuis le même écran si cela ne vous convient pas. Le widget passe en ligne sur chaque vue de magasin activée.
Ce qu'il vous faut
- Accès administrateur à votre boutique Magento 2 (Open Source 2.4.4+ ou Adobe Commerce)
-
Accès Composer et accès SSH (ou terminal) pour exécuter
bin/magento - Un compte Emporiqa, ou créez-en un pendant l'étape 1 (gratuit, 25 $ de crédit d'inscription, sans carte requise)
First, install the module. The Emporiqa module is live on the Adobe Commerce Marketplace. Install it via Composer with your Marketplace access keys configured in auth.json:
composer require emporiqa/module-chat-assistant
bin/magento module:enable Emporiqa_ChatAssistant
bin/magento setup:upgrade
bin/magento cache:flush
Magento registers the module, runs schema patches, and clears the cache. Webhook events go to Magento's DB message queue (consumer: emporiqa.webhook.consumer), production cron handles this automatically; in local dev, start it manually with bin/magento queue:consumers:start emporiqa.webhook.consumer.
Connectez
Ouvrez Emporiqa → Tableau de bord de synchronisation dans la barre latérale de l'admin. La carte Bienvenue dans Emporiqa vous demande deux choses : quelles vues de magasin synchroniser (le widget de chat apparaît sur ces vues, dans la langue de chaque vue) et quel attribut produit contient la marque (utilisé pour les requêtes type « un lave-vaisselle Bosch » ; laissez sur Aucun si votre catalogue n'a pas de notion de marque). Cliquez ensuite sur Connecter à Emporiqa. Vous serez redirigé vers emporiqa.com pour vous connecter (ou créer un compte gratuit), invité à choisir la boutique Emporiqa à lier, puis renvoyé dans Magento avec votre ID de boutique et votre Secret de connexion déjà enregistrés.

Vous avez déjà vos identifiants ?
Ouvrez Magasins → Configuration → Emporiqa → Assistant de chat et dépliez la section Identifiants manuels (avancé). Collez votre ID de boutique et votre Secret de connexion depuis votre tableau de bord Emporiqa, enregistrez, c'est tout. Utile lorsque la connexion en un clic ne peut pas aboutir (proxy d'entreprise, pas de HTTPS sortant vers emporiqa.com depuis l'admin, ou restauration d'une sauvegarde).
Envoyez votre catalogue
De retour sur Emporiqa → Tableau de bord de synchronisation, la carte d'accueil bascule en Connecté. Prêt à envoyer votre catalogue. Cliquez sur Envoyer mon catalogue ; les produits et les pages CMS sont publiés dans la MessageQueue de Magento et envoyés à Emporiqa en arrière-plan. Les catalogues volumineux prennent quelques minutes ; le tableau de bord affiche la progression en direct. Pour les très gros catalogues, exécutez bin/magento emporiqa:sync:all en CLI.
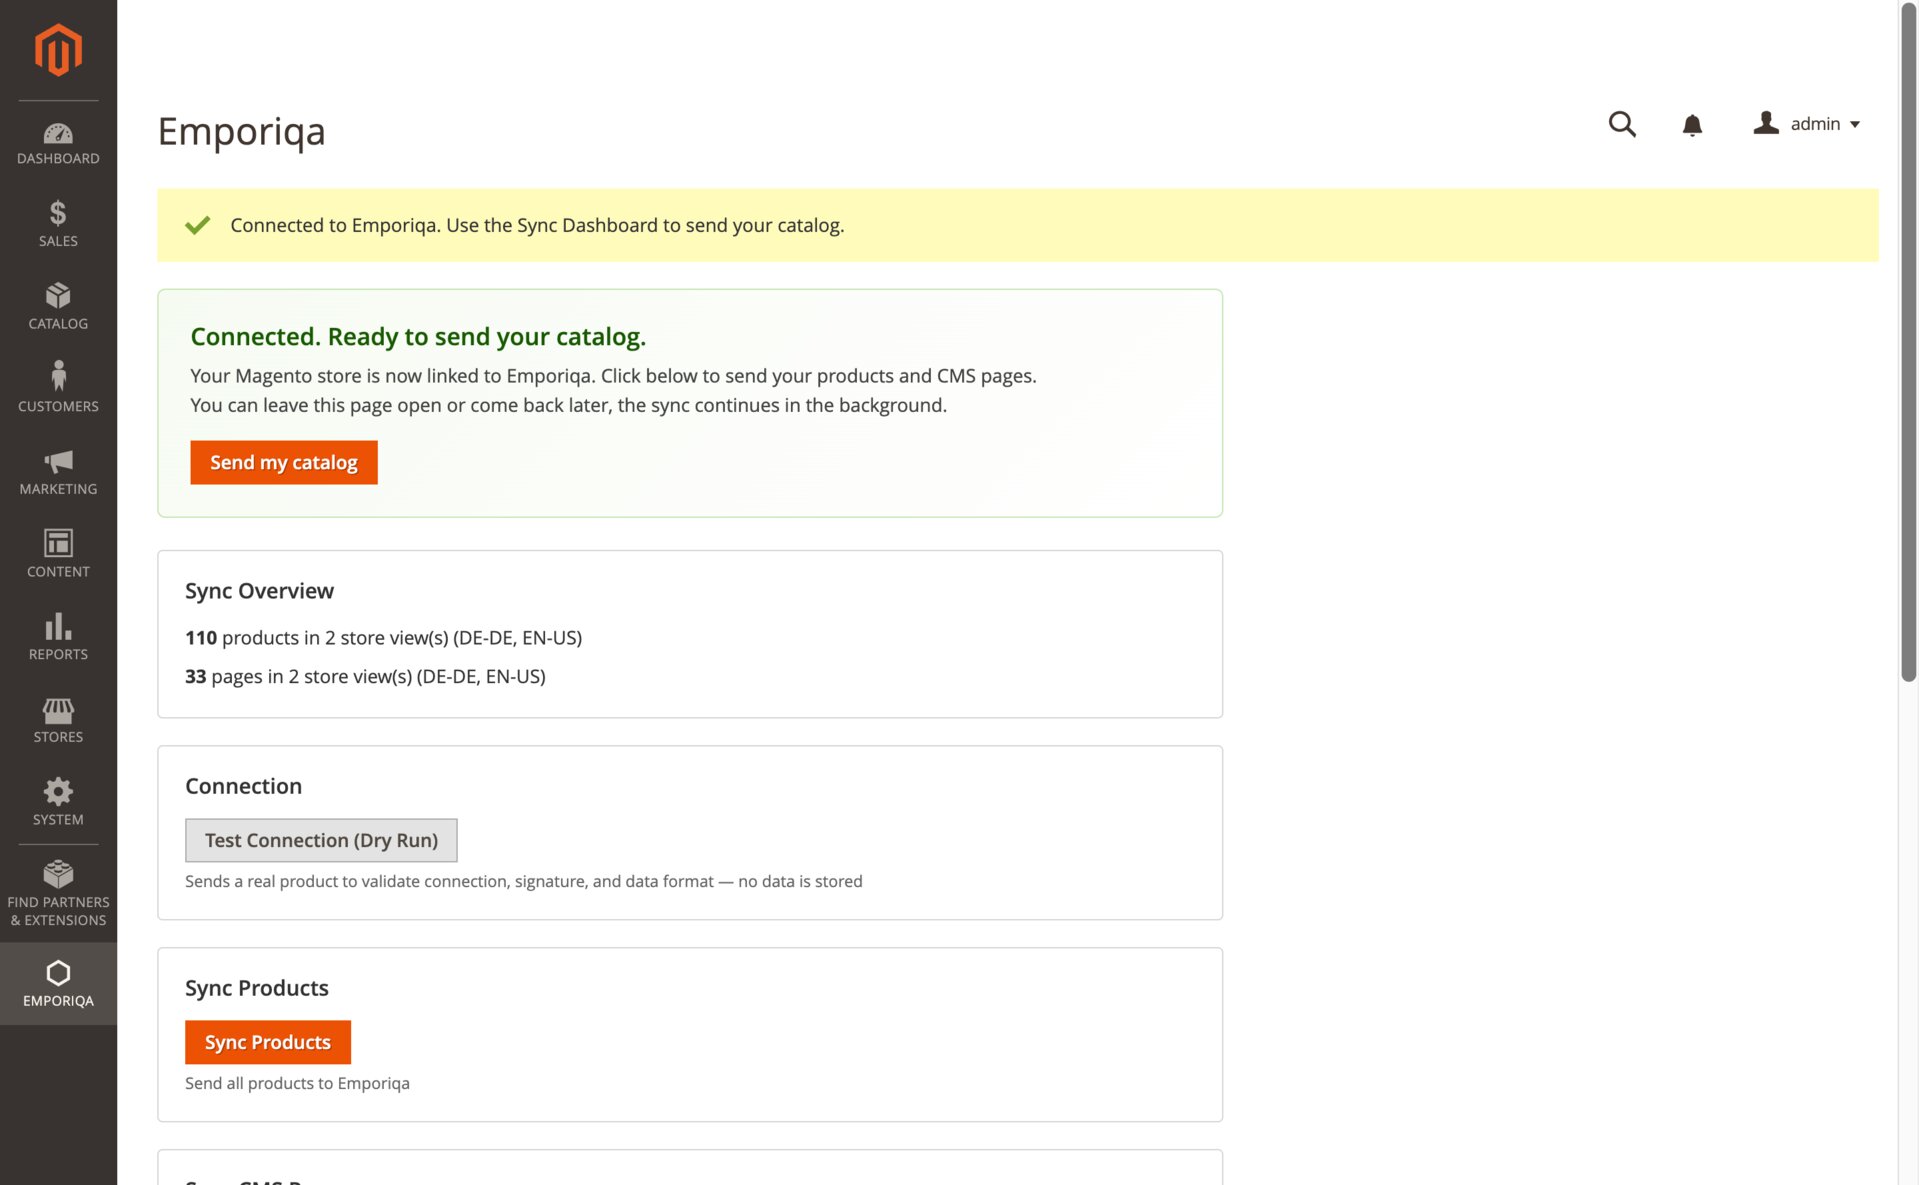
Vérifiez le widget de chat
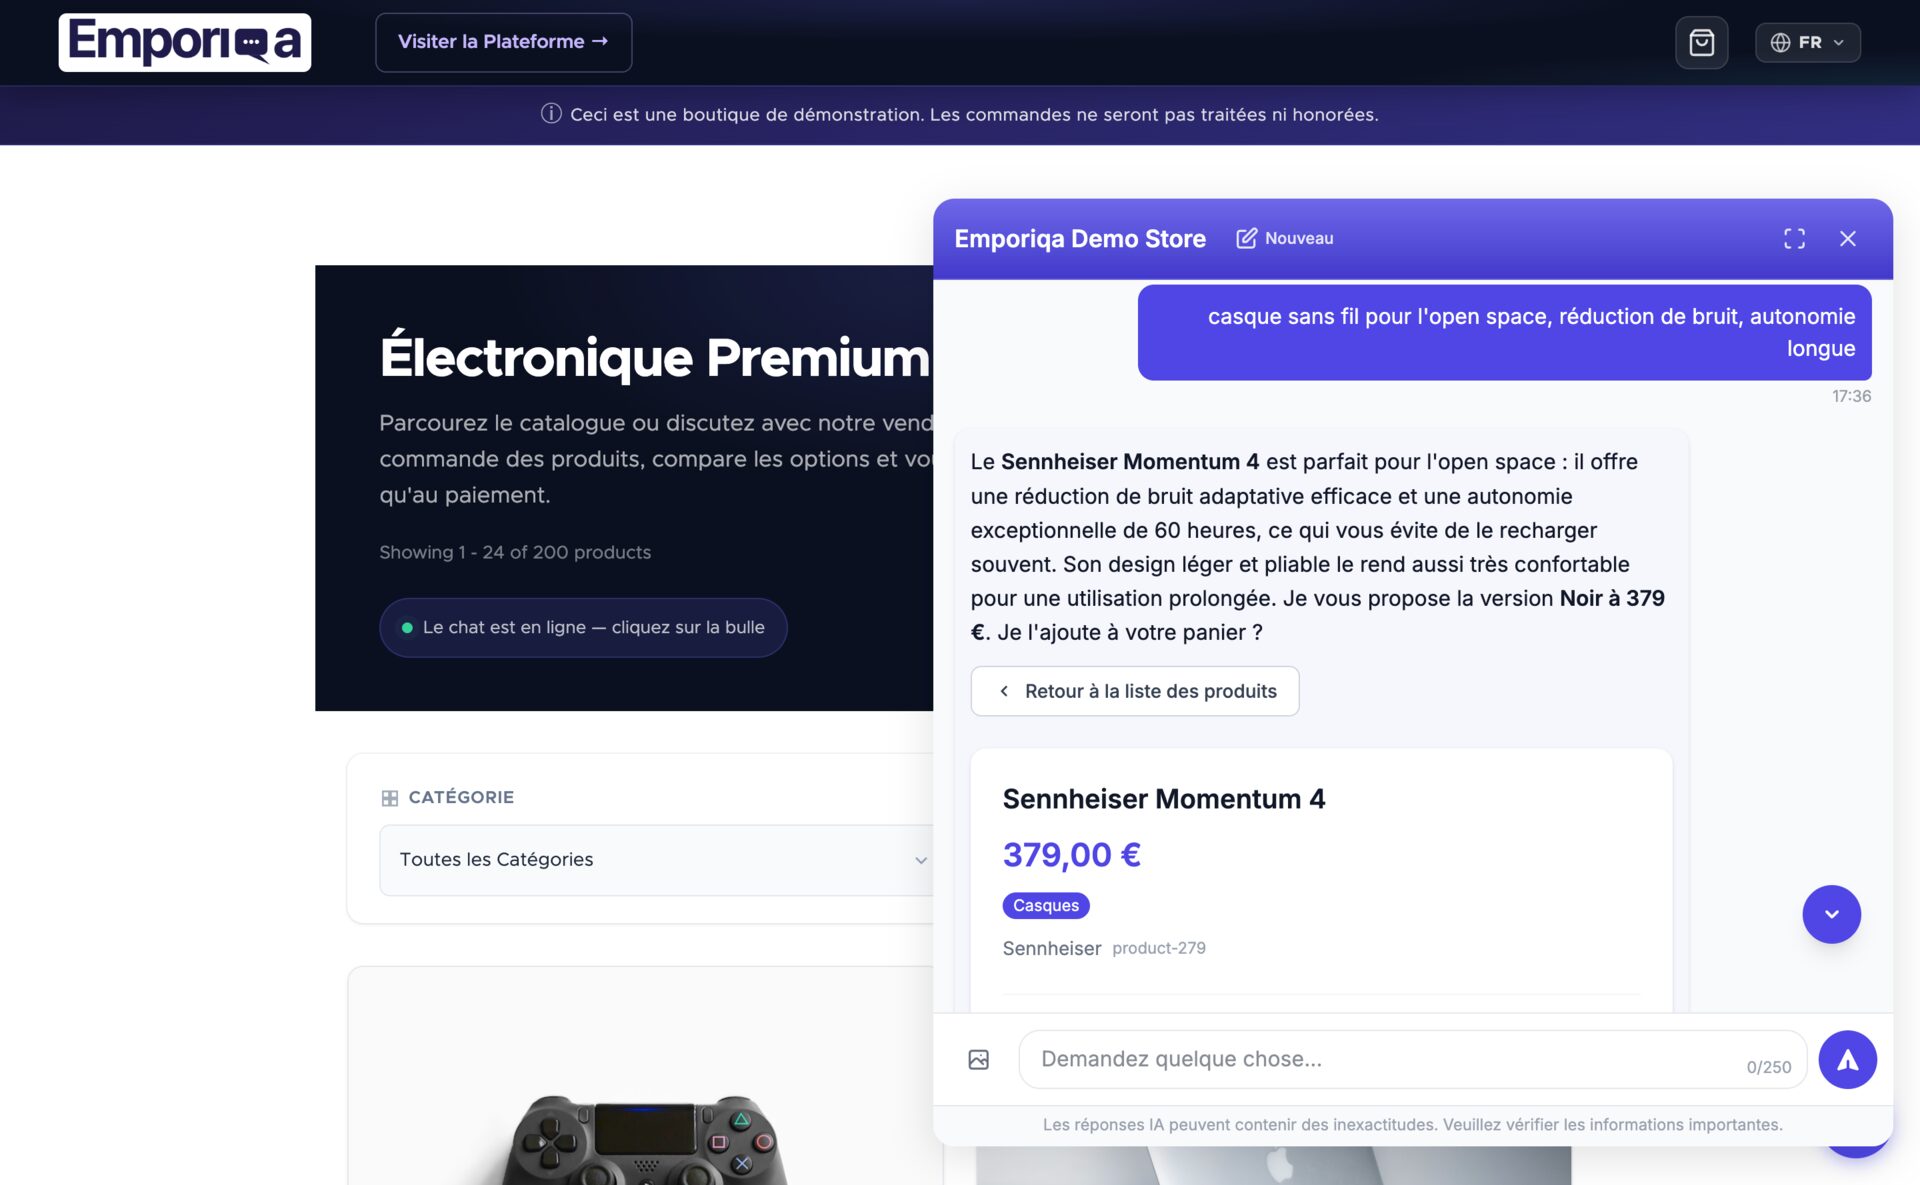
Ouvrez votre vitrine sur n'importe quelle vue de magasin activée. La bulle de chat apparaît en bas à droite. Cliquez dessus, posez une question sur un produit (« avez-vous quelque chose comme X »), et regardez le vendeur répondre à partir de votre catalogue synchronisé.
C'est en ligne
- La connexion est signée et renouvelable depuis le module. Aucun identifiant stocké en clair.
- Les nouveaux produits et pages CMS se synchronisent automatiquement lorsque vous les enregistrez
- Les acheteurs peuvent poser des questions sur les produits, les politiques et leurs commandes
- Ajout au panier dans le chat ; les acheteurs poursuivent jusqu'au paiement de votre boutique Magento
Need to customize sync behavior, add custom fields, or wire up a third-party module?
See Developer DocsDeveloper Documentation
Architecture, configuration reference, webhook payload schema, customization patterns, and CLI commands.
Architecture
The module observes Magento events (catalog_product_save_after, catalog_product_delete_before, cms_page_save_after, cms_page_delete_before, checkout_submit_all_after, and inventory events) and pushes webhook events to Emporiqa via Magento's DB message queue. The observer publishes a message; emporiqa.webhook.consumer processes it asynchronously, so the product save completes without waiting for the webhook delivery.
All translations and channels for a single product or page consolidate into one webhook event. Configurable products cascade up: editing a child variation triggers a parent re-sync so search always sees the full catalog state. Stock changes (orders, cancellations, credit memos, shipments) flow through a separate emporiqa.stock.sync.consumer queue.
Channels are derived automatically from the Magento website code, and salable quantity uses Multi-Source Inventory when available with automatic fallback to legacy stock.
Requirements
| Magento | Open Source 2.4.4+ or Adobe Commerce 2.4.4+ |
| PHP | 8.1 or higher |
| Message queue | DB connection (default in Magento), cron or a running consumer |
| Emporiqa account | Free Emporiqa account ($25 credit on signup) |
Configuration Reference
All settings live at Stores → Configuration → Emporiqa → Chat Assistant. The Sync Dashboard at Emporiqa → Sync Dashboard is for triggering full syncs and testing connection.
General Settings
| Setting | Description |
|---|---|
| Store ID | Your unique Emporiqa store identifier. Saved automatically by the one-click Connect button; pastable manually from the Emporiqa dashboard if needed. The module is active whenever Store ID and Connection Secret are both set. |
| Connection Secret | HMAC-SHA256 signing key for outbound webhooks and inbound order tracking. Stored encrypted. |
| Enabled Store Views | Store views to sync and display the widget on. Each store view's locale maps to a language code (for example en_US → en-us). |
| Brand Attribute | Important. Pick the product attribute that holds the brand or manufacturer for your catalog. The chat assistant uses it for queries like "a Bosch dishwasher with steam". Leave empty only if your catalog has no brand concept. |
| Order Tracking URL | Read-only, auto-generated. Appears after you connect. Copy this URL into your Emporiqa dashboard (Settings → Store Integration → Order Tracking) to enable order lookup from the chat. |
Advanced
Most stores don't need to change these.
| Setting | Default | Description |
|---|---|---|
| Sync Products | Yes | Leave on unless you want to stop propagating product changes. |
| Sync CMS Pages | Yes | Leave on unless you want to stop propagating CMS page changes. |
| Batch Size | 50 | Items per webhook request during full sync (max 500). |
Always-on capabilities
- Order tracking: always active with HMAC signature verification and billing-email matching. Paste the Order Tracking URL into the Emporiqa dashboard to enable lookups from chat.
- Cart operations: customers can add, update, and remove items from inside the chat via the
/rest/V1/emporiqa/cart/*REST endpoints. When the customer is ready to check out, the widget redirects them to your Magento checkout page. - Conversion tracking:
sales_order_save_afterobserver links chat sessions to completed orders for revenue attribution. - Multi-channel: channel auto-derived from Magento website code.
Features
Real-time Webhooks
Products (simple, configurable, and variations) and CMS pages sync via observers on Magento save and delete events. Order completion fires conversion tracking.
Chat Widget
Embedded automatically on all enabled store views. Reads a signed user token from Magento's customer-data section, refreshed on login/logout.
Multilingual
Per-store-view language mapping (Magento locale → ISO code) consolidated into one webhook event per product with translations nested by channel and language.
Configurable Products
Parents synced with is_parent: true and variation attributes; children reference the parent SKU. Editing a child triggers parent re-sync.
Cart Operations
REST endpoints under /rest/V1/emporiqa/cart/* for add, update, remove, and clear items from inside the chat. When the customer is ready to check out, the widget redirects them to your Magento checkout page. Same-origin session cookies, no API tokens needed.
Admin Sync UI
Emporiqa → Sync Dashboard with Sync Products, Sync Pages, and Test Connection actions and live progress.
MSI Support
Salable quantity via Multi-Source Inventory with automatic fallback to legacy stock. Source-item save plugin keeps stock in sync with all warehouses.
Async Queue
DB-backed message queue (emporiqa.webhook.consumer and emporiqa.stock.sync.consumer) keeps webhook delivery off the request path.
Webhook Payload
Each product or CMS page is sent as a single webhook event containing all languages and channels. Translatable fields are nested by channel and language code.
Product Event
{
  "type": "product.updated",
  "data": {
    "identification_number": "product-123",
    "sku": "PROD-123",
    "channels": ["base"],
    "names":        {"base": {"en-us": "Summer Jacket", "de-de": "Sommerjacke"}},
    "descriptions": {"base": {"en-us": "Lightweight jacket...", "de-de": "Leichte Jacke..."}},
    "links":        {"base": {"en-us": "https://store.com/summer-jacket", "de-de": "https://store.com/de/sommerjacke"}},
    "attributes":   {"base": {"en-us": {"Material": "Cotton"}, "de-de": {"Material": "Baumwolle"}}},
    "categories":   {"base": {"en-us": ["Jackets", "Summer"], "de-de": ["Jacken", "Sommer"]}},
    "brands":       {"base": "TrailPeak"},
    "prices":       {"base": [{"currency": "EUR", "current_price": 79.99, "regular_price": 99.99}]},
    "availability_statuses": {"base": "available"},
    "stock_quantities":      {"base": 42},
    "min_order_quantities":  {"base": 1},
    "max_order_quantities":  {"base": null},
    "available_for_order": true,
    "condition": null,
    "is_virtual": false,
    "images":       {"base": ["https://store.com/media/catalog/product/jacket.jpg"]},
    "is_parent": false,
    "parent_sku": null,
    "variation_attributes": {}
  }
}
For configurable products, the parent is synced with is_parent: true and variation_attributes: {"base": {"en-us": ["Color", "Size"], "de-de": ["Farbe", "Größe"]}}. Each child variation is synced with parent_sku referencing the parent's SKU.
CMS Page Event
{
  "type": "page.updated",
  "data": {
    "identification_number": "page-45",
    "channels": ["base"],
    "titles":   {"base": {"en-us": "Shipping Policy"}},
    "contents": {"base": {"en-us": "Free shipping on orders over..."}},
    "links":    {"base": {"en-us": "https://store.com/shipping-policy"}}
  }
}
Magento CMS pages don't have per-store-view attributes. Translations are handled by creating separate page entities assigned to different store views. Each page is exported only for the store views it belongs to.
Field Structure
| Type | Pattern | Fields |
|---|---|---|
| Translatable | {channel: {lang: value}} |
names, descriptions, links, attributes, categories, variation_attributes, titles, contents |
| Shared | {channel: value} |
brands, prices, availability_statuses, stock_quantities, min_order_quantities, max_order_quantities, images |
| Flat | Direct value | identification_number, sku, channels, is_parent, parent_sku, available_for_order, condition, is_virtual |
Customization
The module follows standard Magento 2 extensibility patterns. To customize sync behavior, the formatted payload, or the order tracking response, use plugins, preferences, or observers in your own module.
| Pattern | Use case |
|---|---|
Plugin (around/after) on Emporiqa\ChatAssistant\Model\ProductFormatter |
Modify or extend the product payload before it's queued (add custom attributes, override prices, skip products). |
Plugin on Emporiqa\ChatAssistant\Model\PageFormatter |
Customize the CMS page payload (rewrite content, inject metadata). |
Plugin on Emporiqa\ChatAssistant\Model\OrderTracking |
Modify the order tracking response (add tracking numbers, custom statuses). |
| Preference (DI replacement) | Swap any concrete model class wholesale, for example replace CartManagement or WebhookClient. |
| Observer on standard Magento events | React to the same events the module observes (catalog_product_save_after, checkout_submit_all_after, etc.) to trigger your own logic alongside Emporiqa's. |
Example: skip a product from sync
// app/code/Vendor/Module/etc/di.xml
<type name="Emporiqa\ChatAssistant\Model\ProductFormatter">
    <plugin name="vendor_skip_internal_products"
            type="Vendor\Module\Plugin\SkipInternalProductsPlugin"
            sortOrder="10"/>
</type>

// app/code/Vendor/Module/Plugin/SkipInternalProductsPlugin.php
public function aroundFormat(
    \Emporiqa\ChatAssistant\Model\ProductFormatter $subject,
    callable $proceed,
    \Magento\Catalog\Api\Data\ProductInterface $product
) {
    if ($product->getData('is_internal')) {
        return null; // skip
    }
    return $proceed($product);
}
Example: enrich the product payload
public function afterFormat(
    \Emporiqa\ChatAssistant\Model\ProductFormatter $subject,
    ?array $result,
    \Magento\Catalog\Api\Data\ProductInterface $product
): ?array {
    if ($result === null) {
        return $result;
    }
    $result['data']['custom_field'] = $product->getData('my_custom_attribute');
    return $result;
}
After adding plugins or DI changes, run bin/magento setup:upgrade and bin/magento cache:flush. In production mode, also run bin/magento setup:di:compile.
CLI Commands
All commands run from the Magento root directory.
# Sync all products
bin/magento emporiqa:sync:products

# Sync all CMS pages
bin/magento emporiqa:sync:pages

# Sync products and pages in one command
bin/magento emporiqa:sync:all

# Test webhook connection
bin/magento emporiqa:test-connection

# Adjust batch size
bin/magento emporiqa:sync:products --batch-size=25

# Dry run (no webhooks sent)
bin/magento emporiqa:sync:products --dry-run

# Start the webhook consumer manually
bin/magento queue:consumers:start emporiqa.webhook.consumer
Sync Sessions
Each sync operation creates a session that tracks what was sent:
sync.start: opens a session (withsession_idandentity).- Batched events: product/page data tagged with
sync_session_id. sync.complete: closes the session. Items not seen during the session are marked deleted on the backend.
Sessions expire after 24 hours. For very large catalogs, lower --batch-size to fit completion within the window.
Order Tracking
Emporiqa can look up order status on behalf of customers during chat conversations. The module exposes a signed REST endpoint that Emporiqa calls when a customer asks about their order.
Flow
- Customer asks “Where is my order #12345?” in the chat.
- Emporiqa sends an HMAC-SHA256 signed POST to your store.
- The module looks up the order, verifies the customer's email matches the billing email, and returns the status.
- The salesperson presents the order information to the customer.
Endpoint
POST /rest/V1/emporiqa/order/tracking
Setup
The endpoint is always active once the module is installed. Email verification is always required. The customer's email must match the order's billing email before any data is returned. To enable order lookup from chat, set the Order Tracking API URL in your Emporiqa dashboard (Store Settings → Integration) to:
https://your-store.com/rest/V1/emporiqa/order/tracking
Requests are authenticated using the same HMAC-SHA256 connection secret. Requests older than 5 minutes are rejected. If the customer's email doesn't match the billing email, the endpoint returns 404 to avoid leaking order existence. See the Webhook Setup Guide for the full request/response schema.
Order tracking is optional. Without the dashboard URL configured, order questions route to the Customer Support agent instead.
Troubleshooting
Connection test fails
The Test Connection button returns a one-line result: either ✓ Connected or Connection failed: HTTP <code>: <reason>. Match the reason to one of these:
- HTTP 401: Invalid connection secret: Store ID and Connection Secret don't match what's saved on the Emporiqa dashboard. Click Reconnect, or paste credentials manually.
- HTTP 404: Store not found: the Store ID points at a store that's been deleted on the Emporiqa side. Reconnect to pick a different store.
- HTTP 429: Throttled: rate-limited. Wait the duration in the response hint and retry.
- Network or HTTP 5xx: verify the server can make outbound HTTPS requests; check
var/log/system.logfor the full body.
Products not syncing
- Ensure Sync Products is enabled in settings.
- Verify products are enabled and visible (not “Not Visible Individually”).
- Run
bin/magento emporiqa:sync:productsto force a full sync. - Check CLI output for webhook errors.
Chat widget not appearing
- Confirm the module is enabled and Store ID is configured.
- Check that the current store view is in the Enabled Store Views list.
- Look for JavaScript errors in the browser console.
- Verify the scripts are in page source (View Source, search for
emporiqaConfig).
Queue not processing
The Sync Dashboard shows a yellow "Webhook consumer may not be running" banner when messages have been stuck in the queue for more than 5 minutes. When it appears:
- Check Magento cron is active:
bin/magento cron:status. - Start the consumer directly:
bin/magento queue:consumers:start emporiqa.webhook.consumer. - Confirm
cron_consumers_runnerisn't disabled inapp/etc/env.php. - Check
var/log/system.logfor the friendly reason on each failed delivery (HTTP 401, 429, etc.). The consumer's exception now includes it. - As an immediate workaround, click Sync Products or Sync Pages from the dashboard; those run direct HTTP, bypassing the queue.
Cache or DI issues after configuration changes
- Run
bin/magento cache:flush. - For constructor or DI changes (after module updates):
rm -rf generated/code/*thenbin/magento cache:flush.
Related Articles
Multilingual Chat Support
Cross-language search, 65+ languages, how translations sync.
5 Questions Before You Pay
Evaluation checklist: data sync, handoff, pricing, languages, attribution.
Conversion Tracking
Prove chat ROI: session to cart to purchase attribution.
Webhook Setup Guide
Generic webhook reference: signing, payloads, sync sessions.
Answer accuracy: the salesperson answers from your synced catalog and store pages. It does not invent products, prices, or discount codes; when it is unsure, it hands the conversation to your team. You can check this yourself on unedited demo answers, each with a link to rerun the exact query: emporiqa.com/proof.
Reviewed before listing: every Emporiqa plugin passes the platform's own review process before it is published on WordPress.org, PrestaShop Addons, Adobe Commerce Marketplace, and drupal.org. The source code is public on GitHub and Packagist, so your developer can read it.
Who makes Emporiqa: Emporiqa is built by Rosel Group LTD, an EU company based in Sofia, Bulgaria, founded by Rosen Hristov, who has built e-commerce software for 15 years. It is GDPR-compliant and never uses your data to train AI models. Emporiqa runs on self-hosted platforms (WooCommerce, Magento and Adobe Commerce, PrestaShop, Drupal Commerce, Shopware 6, Sylius); it does not run on Shopify.